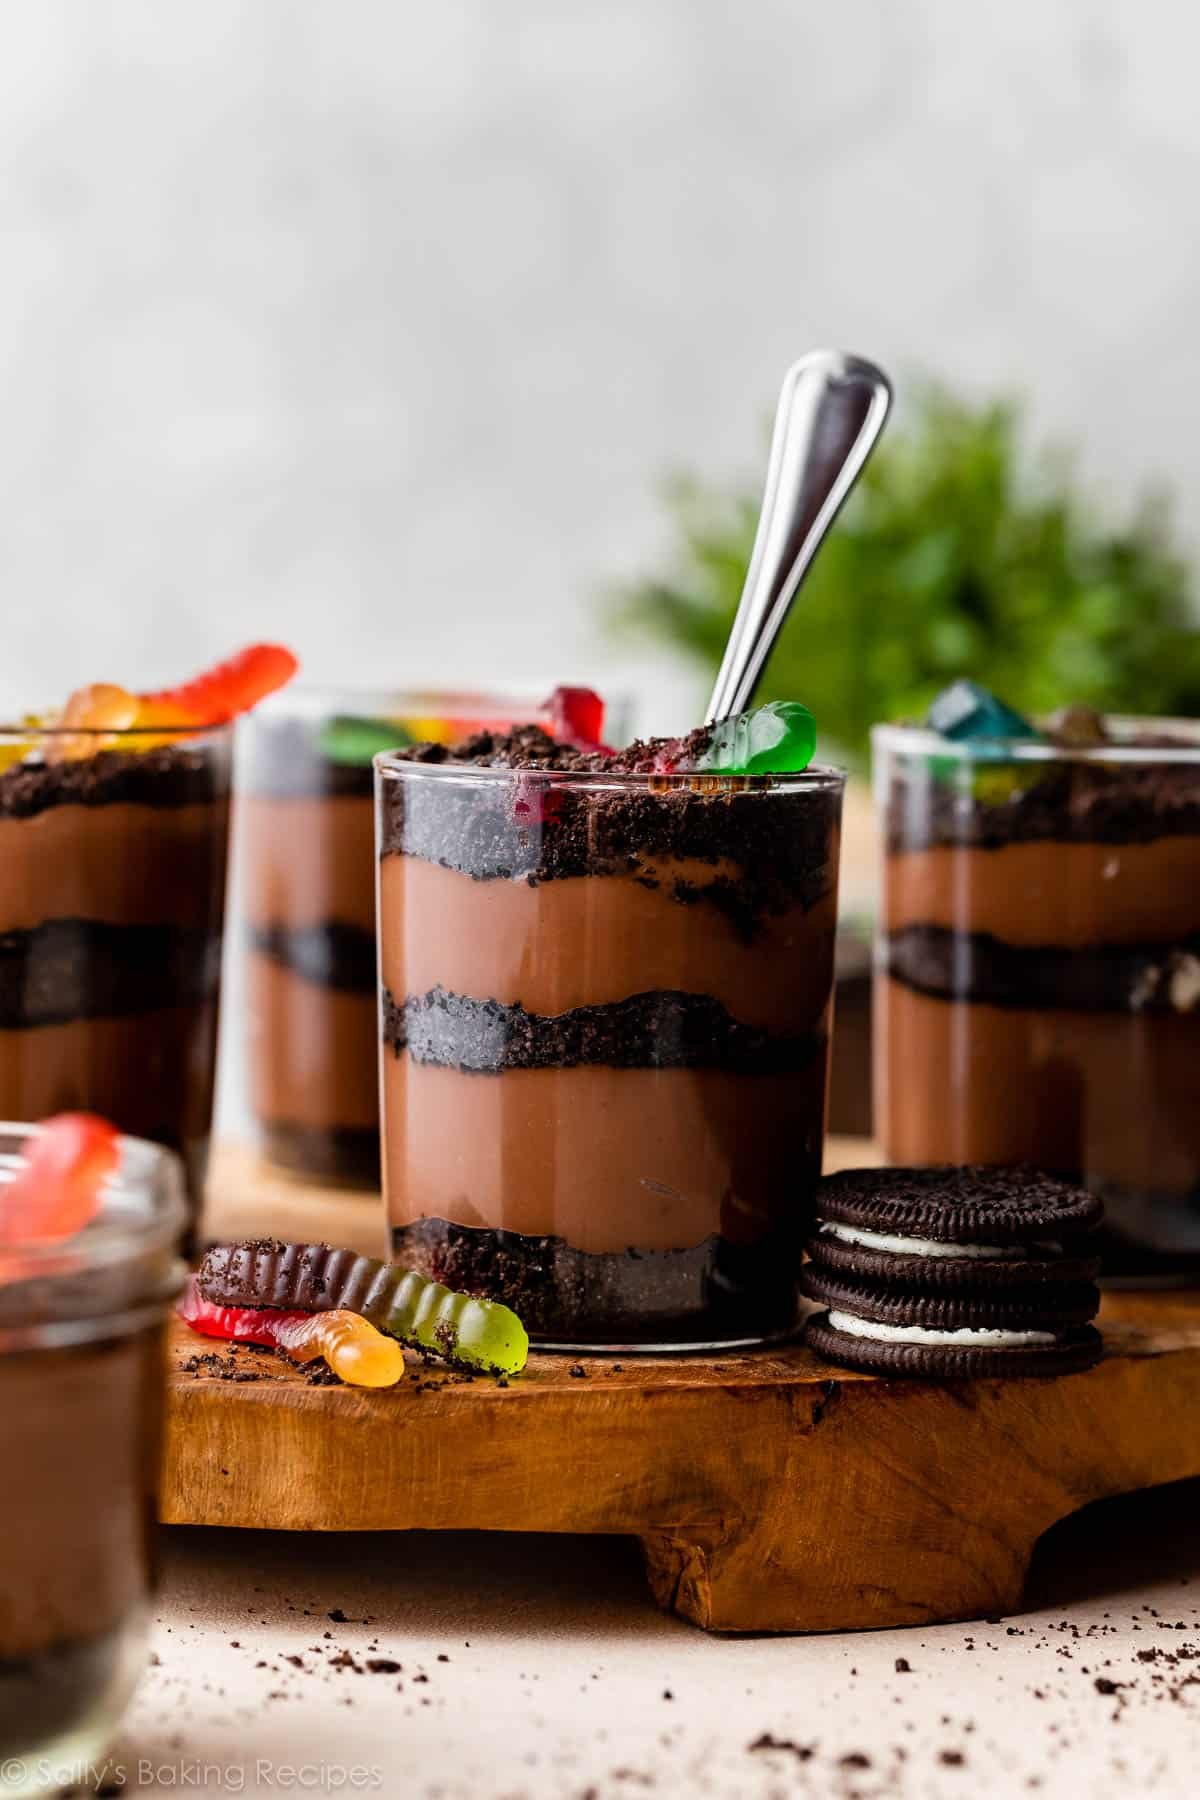
This no-bake, make-ahead homemade dirt pudding recipe is as fun to make as it is to serve and eat. With its layers of creamy homemade chocolate pudding, crushed Oreo cookies, and buried gummy worms, this whimsical dessert brings out the inner child in everyone. Eating dirt and worms has never been so delicious (or encouraged)!
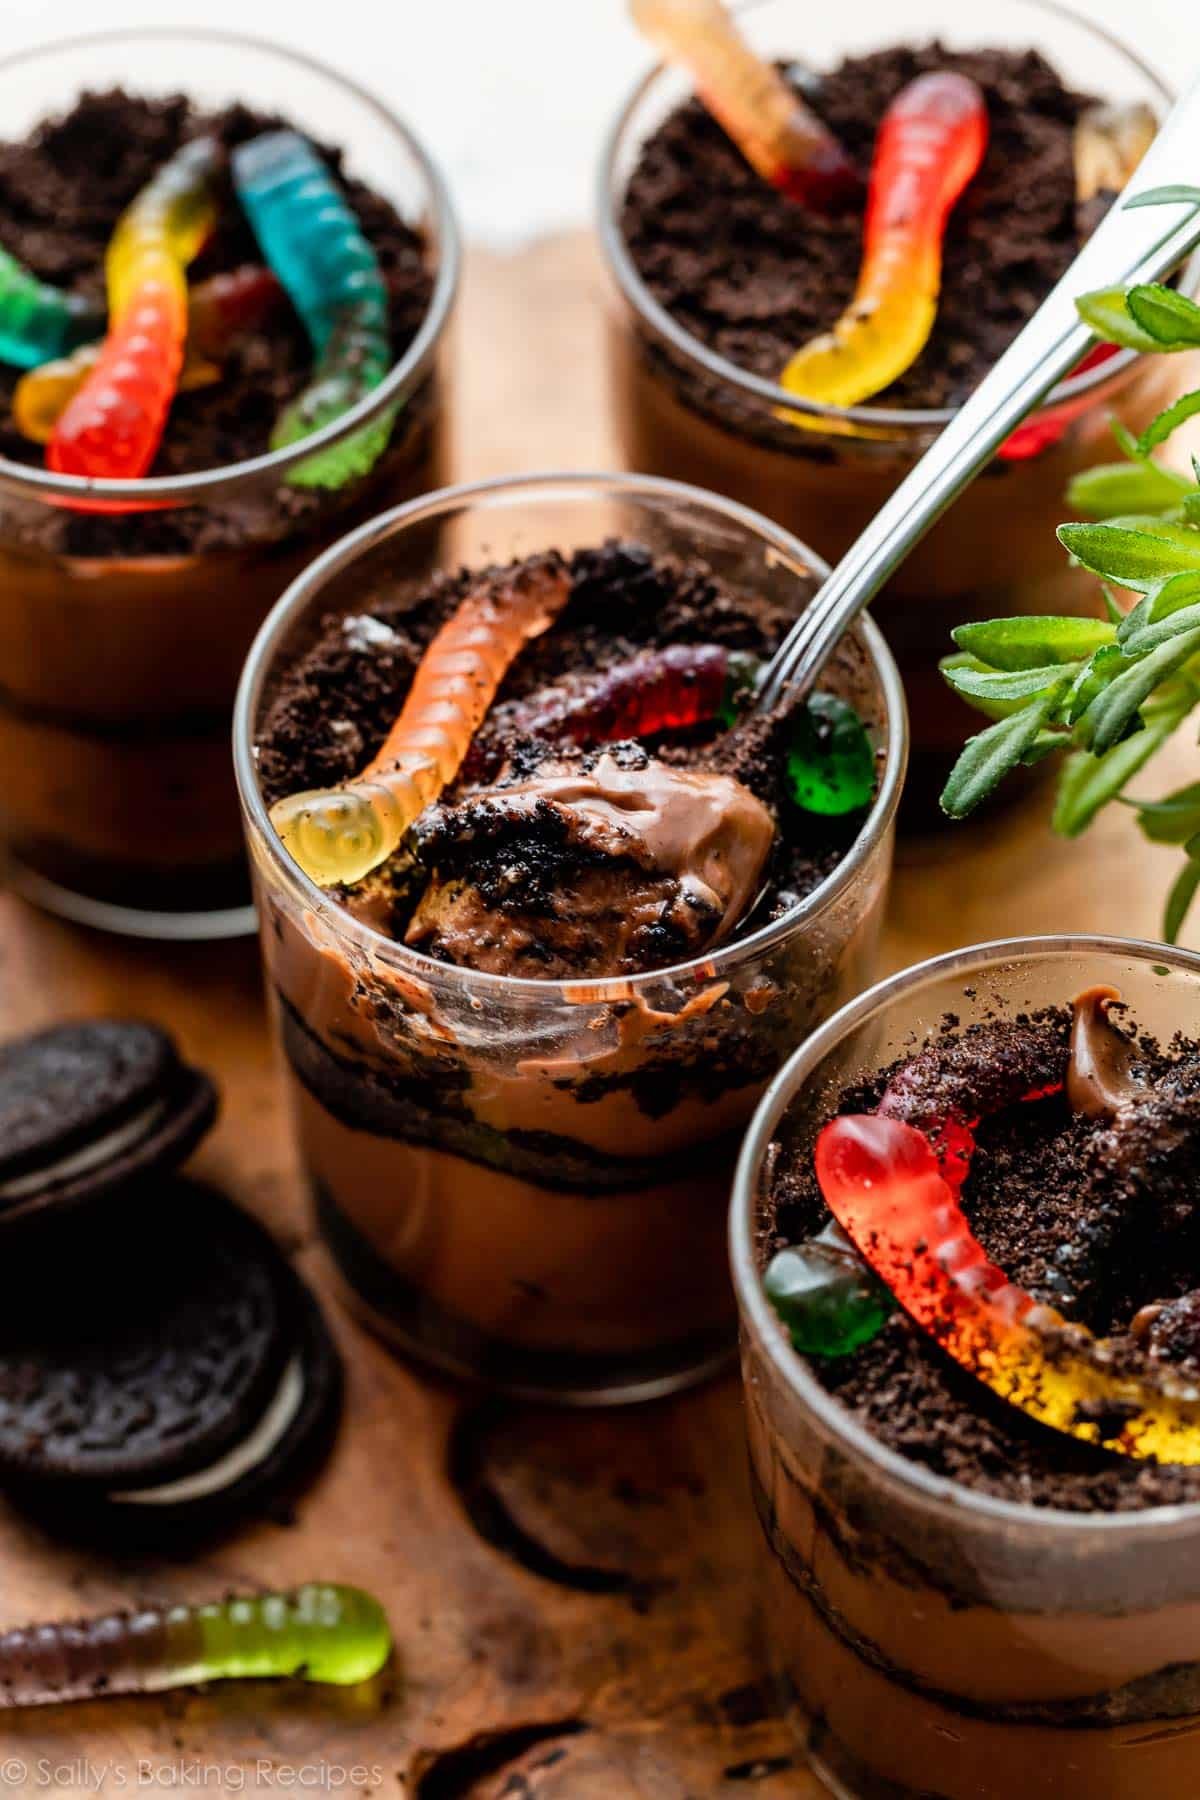
Go on, I dare even the grumpiest grownup to resist a smile when they’re handed a cup of dirt and worms to eat with a spoon. Even the worms are smiling like they’re in on the joke. ????
Why Would I Eat Dirt?
Fair question. Here’s why you will love this homemade dirt pudding dessert:
- Smooth, creamy milk chocolate pudding is surprisingly easy to make from scratch!
- Layers of Oreo cookie crumbs provide a wonderful texture contrast.
- This is a no-bake, make-ahead dessert.
- You can decorate the top to suit your party or holiday theme (ideas below)!
- Makes a great treat for kids’ parties, spring or summertime, or Halloween.
- You can layer it in cups for individually portioned desserts, or all in 1 large baking dish or bowl.
- Fun to make, fun to eat! Both kids and kids-at-heart love digging into this dessert.
Ingredients You Need for Homemade Dirt Pudding
This is from-scratch stovetop chocolate pudding, and the best way I know how to make it. You don’t have to serve it as dirt and worms! It’s incredible plain, as a trifle, or in a baked pie crust. Here’s what you need:
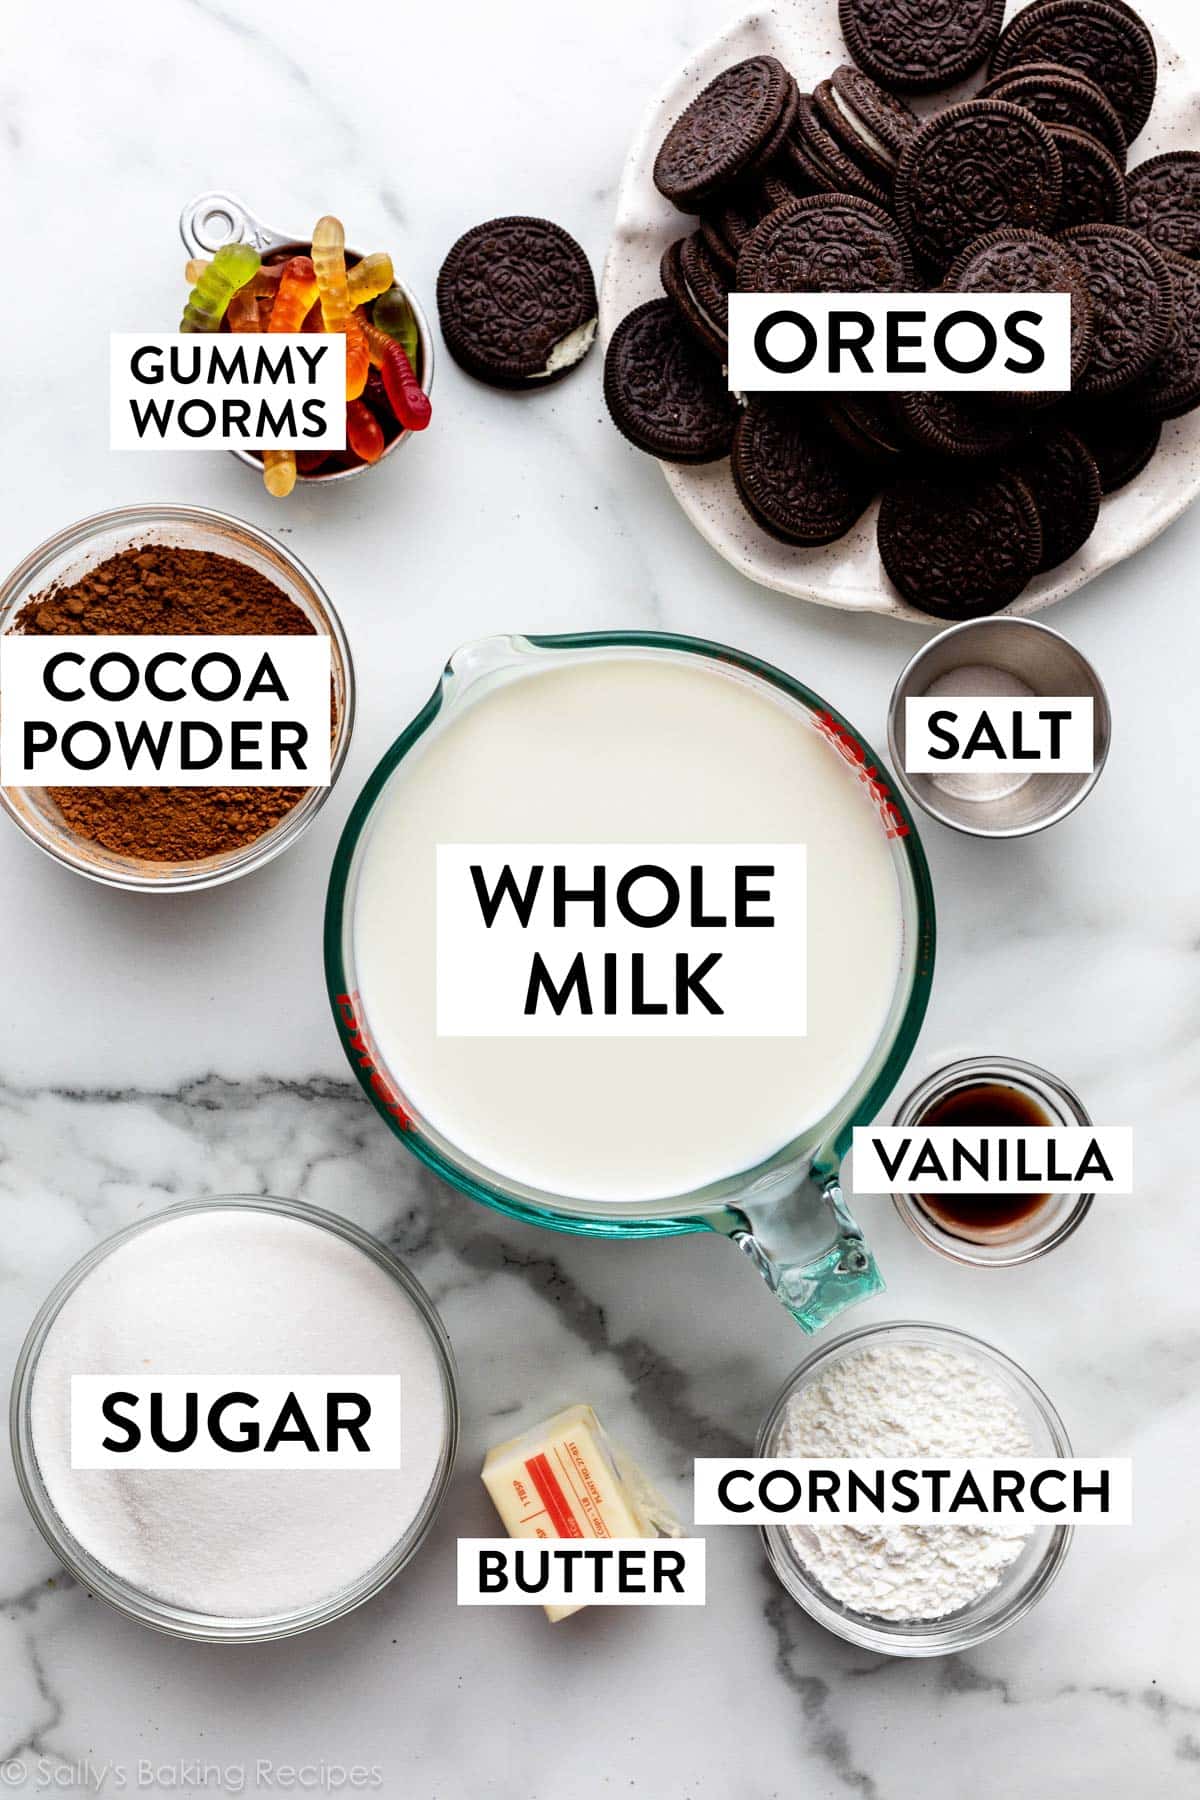
- Sugar: For sweetening the pudding.
- Cocoa Powder: I use unsweetened natural cocoa powder, which, when combined with the sugar and milk, makes a nice milk chocolate pudding (a kid favorite!). If you prefer the bittersweet flavor of dark chocolate, you can use Dutch-process cocoa powder or Hershey’s Special Dark cocoa powder instead.
- Cornstarch: This is the thickening agent for the pudding, just like we need for banana cream pie, coconut cream pie, and banana pudding.
- Salt: A little salt balances the sweet.
- Whole Milk: Use whole milk in this recipe. If you want to substitute in lower fat or nondairy milk, increase the cornstarch. I tested it, and almond milk worked nicely but the consistency was much thinner even with 1 extra Tablespoon of cornstarch. So, keep that in mind.
- Butter: Just 3 Tablespoons stirred in at the end of cooking gives the pudding a richer flavor, helps it continue to thicken, and smooths it out.
- Vanilla Extract: Flavor enhancer.
- Oreos: Crush classic or peanut butter Oreos for the “dirt” layers, or crush Golden Oreos for “sand” if you’d prefer a beach theme! (See below for some more theme inspiration and ideas.)
- Gummy Worms: Always the kids’ favorite part of this treat!
Have you ever tried my butterscotch pudding before? The chocolate pudding is similar, but there’s no need for egg yolks. The cornstarch obviously helps thicken, but the cocoa powder does too.
Make the Homemade Chocolate Pudding
Making homemade chocolate pudding is so much easier than you’d think, and the full printable recipe is below. These brief notes and step-by-step photos will help you understand the process before you begin. First, you’ll combine most of the ingredients in a medium saucepan over medium heat. (You’ll stir the butter and vanilla in after cooking.)
I removed the saucepan from heat just to show you this picture. Here’s the sugar, cocoa powder, cornstarch, salt, and milk combined. It’s pretty thin before it begins cooking:
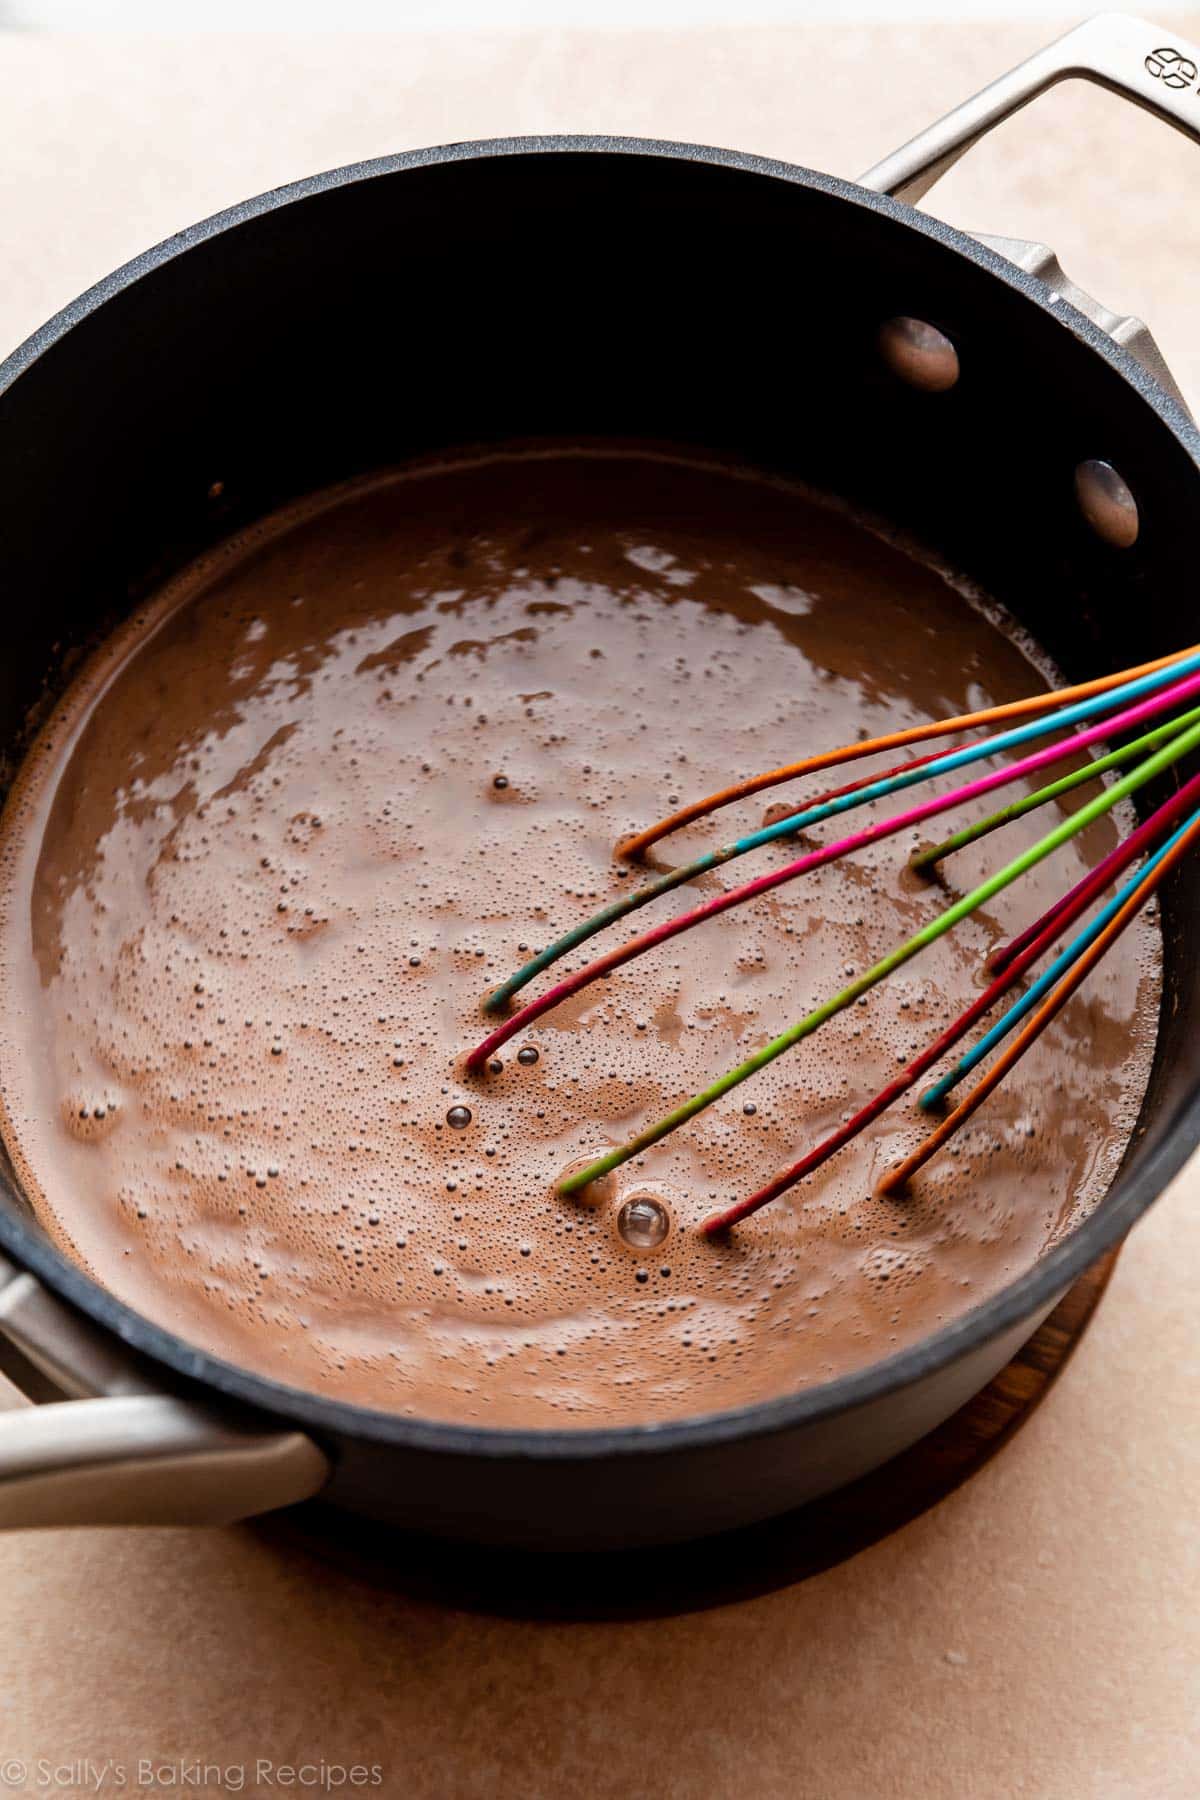
Making homemade pudding is all about whisking. I always like to say: if you know how to whisk, you know how to make pudding.
Whisking occasionally, cook the mixture until it begins boiling. You want big bubbled erupting and popping in the very center of the pan. When that happens, let it boil for 1 minute, and then whisk in the butter and vanilla extract off heat.
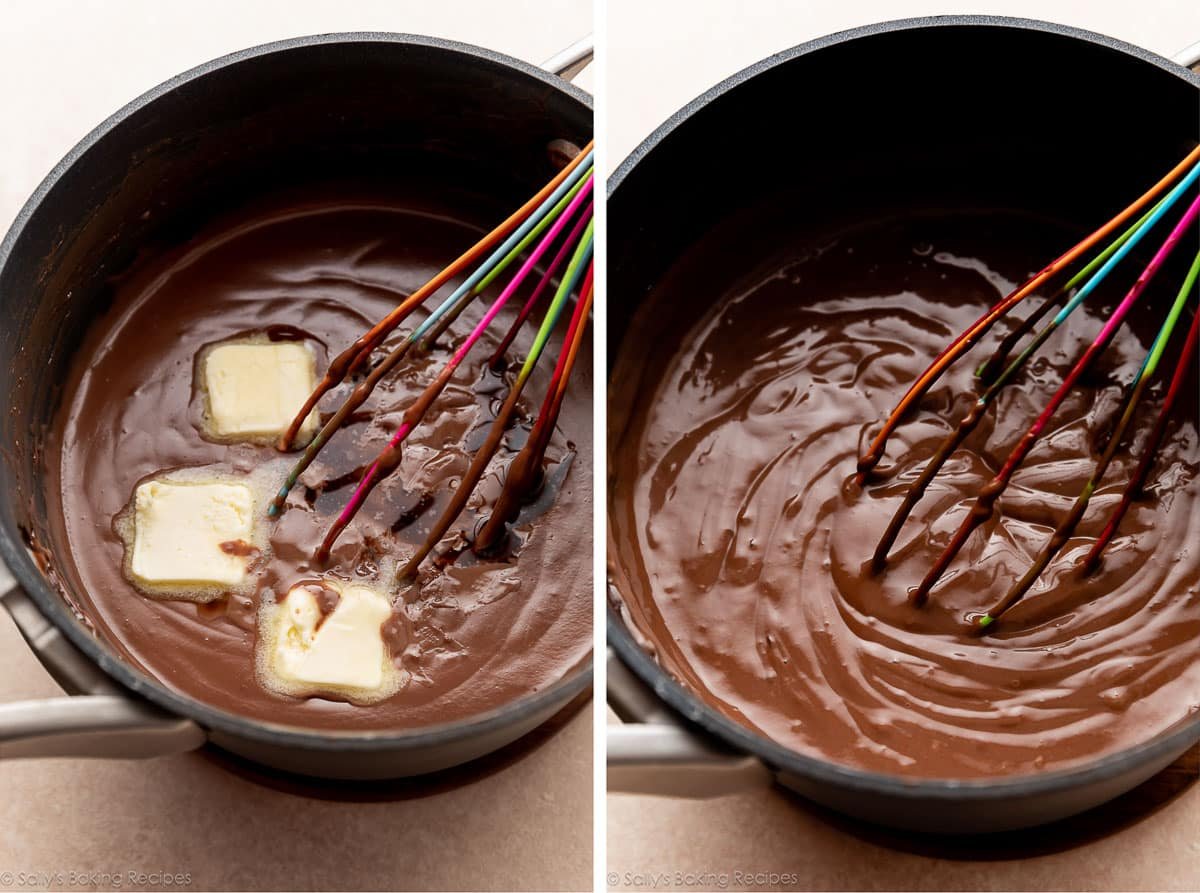
Look how wonderfully thick! Pour the hot pudding into a heatproof bowl, and let it sit for 5 minutes. Then place plastic wrap directly on the surface to prevent a rubbery “skin” from forming on top.
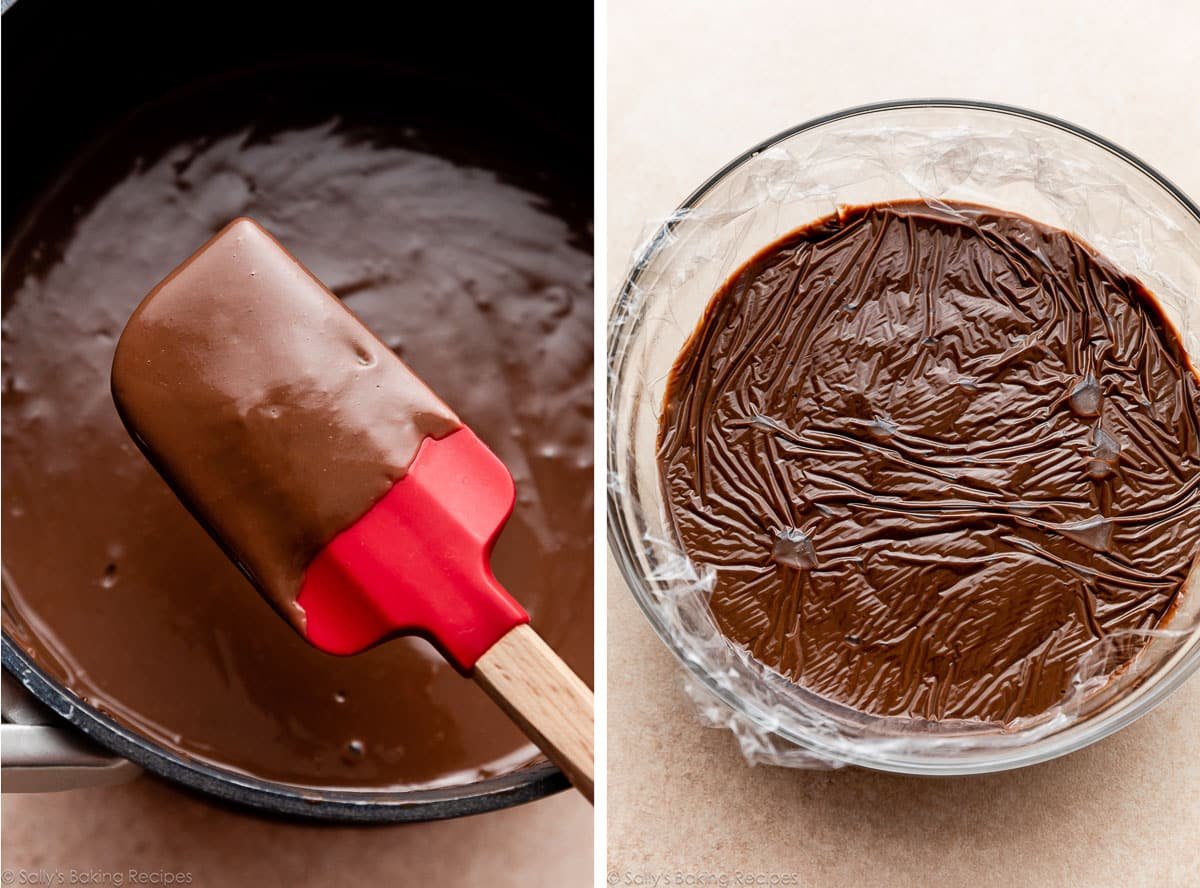
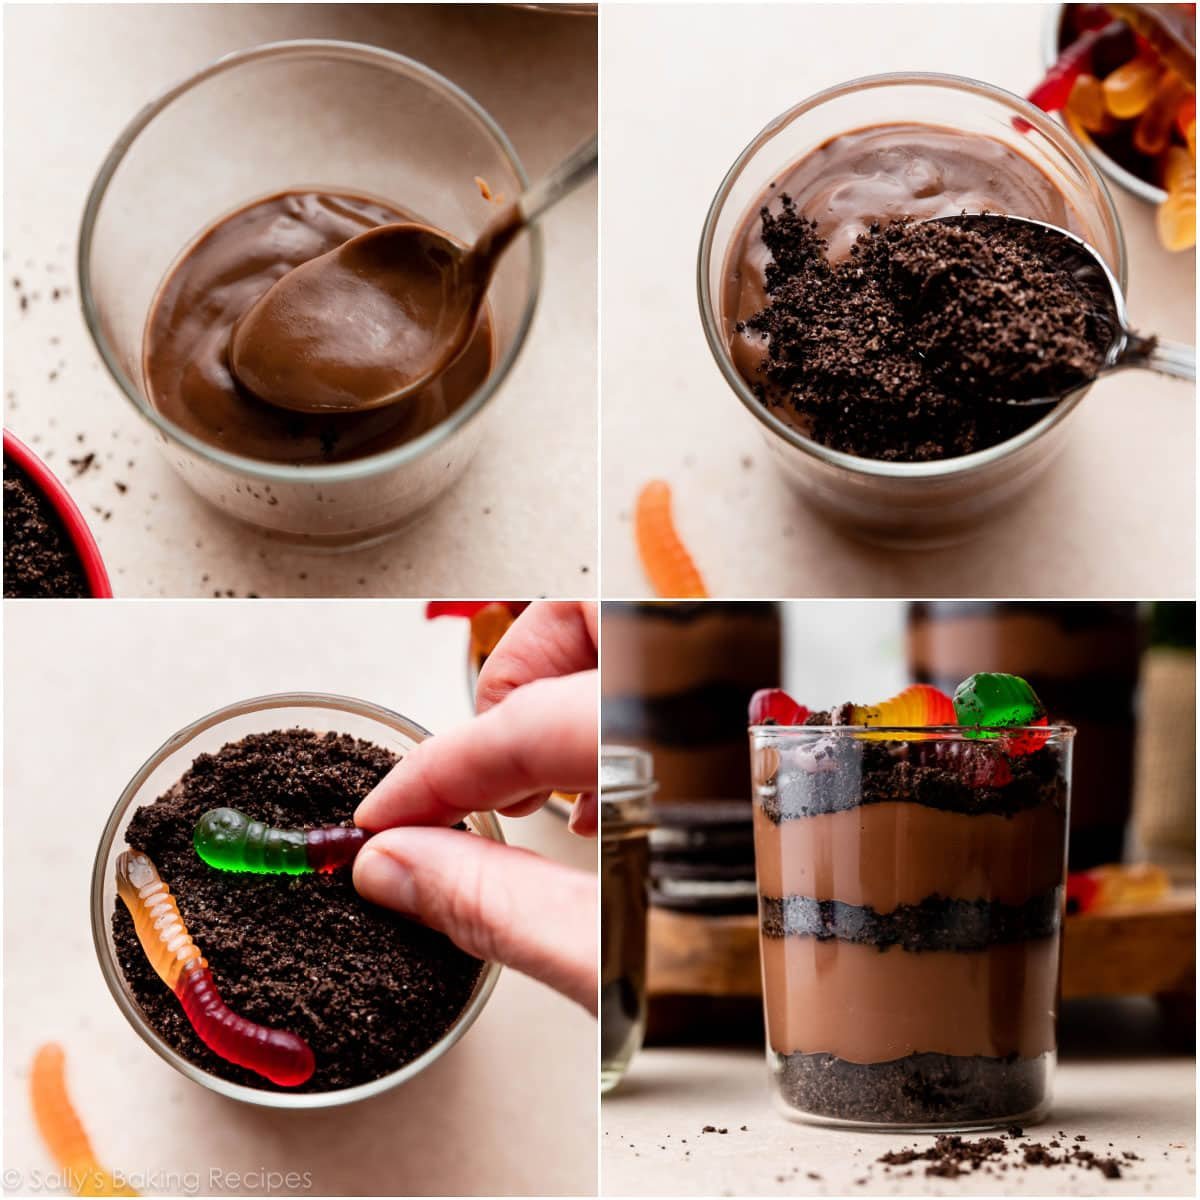
Let the pudding thicken in the refrigerator for an hour, and then assemble the dirt cups. After that, refrigerate the assembled dirt cups for 3 hours and up to 48 hours. Great make-ahead dessert!
Layer the Dirt Dessert Cups
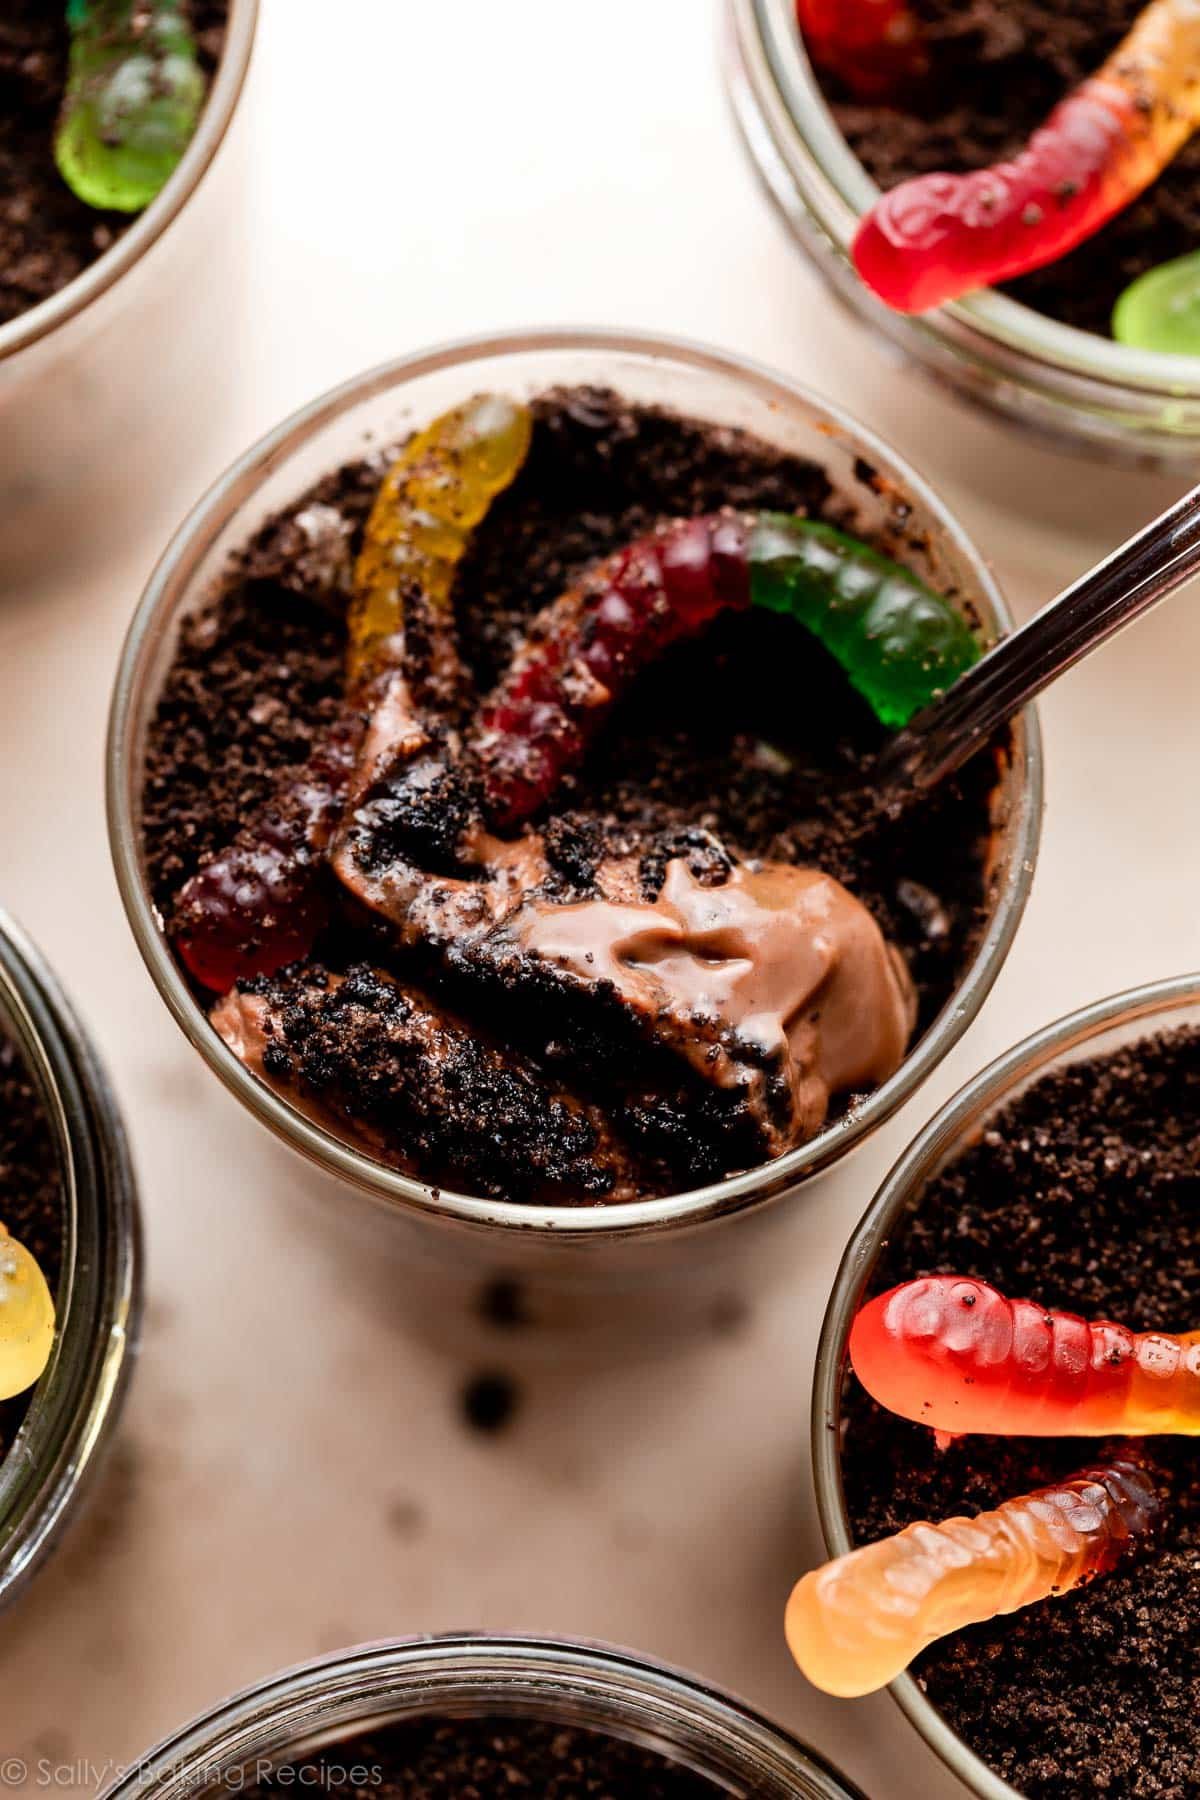
This recipe makes about 4 cups of pudding, so that’s enough for eight 1/2-cup servings of pudding. Layer a couple spoonfuls of crumbs into the bottom of each glass, followed by a layer of pudding (about 1/4 cup), and repeat with another layer of crumbs, a second 1/4-cup layer of pudding, and a final topping of crumbs. Don’t forget the worms!
Success Tip: Taking these to go? Use glass jars with lids or plastic cups with lids to make transporting easy!
You can also make this as a larger dessert, rather than individual cups, in a 9-inch-square glass baking dish or glass trifle bowl.
Other Ideas for Decorating Dirt Pudding
Here are a few more ideas to inspire you—get creative and have fun with it!
- Flower Pot: Flower pot, gummy worms, shovel spoons, flower lollipop
- Halloween: Candy pumpkins, candy eyeballs, Halloween sprinkles
- Beach: Mini pails, Golden Oreos for the “sand,” shovel spoons, cocktail umbrellas, gummy flip-flops. You could even use vanilla or banana pudding for a lighter color.
- Pirate Buried Treasure: Treasure box, Golden Oreos for the “sand,” chocolate coins
- Easter: Green-tinted sweetened shredded coconut “grass” on top, candy eggs, mini chocolate bunny
- Terrarium: Clear glass tumbler for visible layers, chocolate candy succulents, chocolate pebbles, meringue mushrooms
No matter how you decorate or serve these dirt pudding cups, kids and kids-at-heart cannot get enough. Here’s to a silly, happy dessert!

Homemade Dirt Pudding
Prep Time: 40 minutes
Cook Time: 10 minutes
Total Time: 4 hours, 50 minutes (includes refrigeration)
Yield: 8 1/2 cup pudding servings
Category: Dessert
Method: Cooking
Cuisine: American
Description
This homemade chocolate pudding comes together in about 10 minutes on the stove. You’ll want to make and assemble these pudding cups ahead of time so the chocolate pudding has time to thicken in the refrigerator. Crushed Oreo cookies and gummy worms turn the smooth and creamy from-scratch pudding into “dirt!”
Instructions
- Make the pudding: Whisk sugar, cocoa powder, cornstarch, and salt together in a medium saucepan and place the saucepan over medium heat. While whisking, slowly pour in the milk and whisk until combined.
- Bring the mixture to a boil, whisking occasionally. This will take about 10 minutes and do not try to rush it by turning up the heat, as the pudding will not thicken properly. The mixture will begin to bubble around the edges, and then in the center. Once bubbling in the center, whisk constantly and allow to boil for 1 minute. The pudding should be thickened, and you’ll know it’s thickened enough if it coats the back of a spoon or spatula without dripping off.
- Remove from heat, and then whisk in the butter and vanilla.
- Pour into a heatproof bowl, let sit for 5 minutes, and then place a piece of plastic wrap directly on the surface of the pudding to prevent a skin from forming on top. Refrigerate for 1 hour. The pudding will not be fully thickened at this point, as you still want it a little thin to assemble the pudding cups in step 6.
- Place the Oreos in a food processor or blender and pulse into crumbs.
- Assemble the dirt dessert: It’s helpful to know that this recipe makes 4 cups of chocolate pudding, and you can make individual cups, a trifle, or assemble/serve in a 9-inch baking pan. The amount of pudding/Oreo crumbs in each cup really depends on the size of the cup (or other vessel) you are using. You’ll want to layer Oreo crumbs on the bottom, then pudding, Oreo crumbs in the middle, more pudding, and more Oreo crumbs on top. Start with a couple Tablespoons of Oreo crumbs in the bottom of each cup. Spoon 1/4 cup of pudding on top of the Oreo layer, then repeat with another couple of spoonfuls of Oreo crumbs, another 1/4 cup of pudding, and a final layer of Oreo crumbs. Place a few gummy worms in the top layer of Oreo crumbs.
- Refrigerate uncovered for 3 more hours and up to 48 hours.
- Cover and store leftover cups in the refrigerator for up to 3 days.
Notes
- Make Ahead Instructions: This is a make ahead dessert because the pudding cups need to set and thicken. You can assemble the pudding cups up to 48 hours in advance. See step 7.
- Special Tools (affiliate links): Whisk | Food Processor or Blender/Chopper | Glass Cups (pictured are something like this), or try Glass Jars With Lids, Plastic Cups with Lids, or Trifle Bowl
- Milk: Whole milk is the best choice for this pudding. If you’d like to try a lower fat milk or nondairy milk, add 1 more Tablespoon of cornstarch. But keep in mind that the pudding will still not thicken quite as much as the whole milk version.
Stay connected with us on social media platform for instant update click here to join our Twitter, & Facebook
We are now on Telegram. Click here to join our channel (@TechiUpdate) and stay updated with the latest Technology headlines.
For all the latest Food and Drinks News Click Here